Problem: Running LLMs Locally Without the Hassle
You want to self-host a language model on your home server — inference on your own hardware, no API costs, full control. But most guides assume a cloud setup or skip the tricky parts like CUDA versions and model compatibility.
You'll learn:
- How to install vLLM with the correct CUDA dependencies
- How to load and serve a model via an OpenAI-compatible API
- How to verify it's working and tune for your hardware
Time: 30 min | Level: Intermediate
Why This Happens
vLLM is built for GPU-accelerated inference. Getting it running at home means matching your CUDA version, PyTorch build, and vLLM release — mismatches cause silent failures or cryptic CUDA errors that are hard to trace.
Common symptoms:
RuntimeError: CUDA error: no kernel image is available for execution on the device- Model loads but returns garbage output
- Server starts but hangs on first request
Solution
Step 1: Check Your GPU and CUDA Version
Before installing anything, confirm what you're working with.
nvidia-smi
# Also check the CUDA toolkit version
nvcc --version
Expected: You should see your GPU model and driver version. vLLM requires a GPU with compute capability 7.0+ (Volta or newer — RTX 2000 series and up).
 Your GPU should show here. No output means driver issues — fix those first.
If it fails:
nvidia-smi: command not found: Install NVIDIA drivers first viaubuntu-drivers autoinstall- Compute capability < 7.0: vLLM won't run on your GPU — consider llama.cpp instead
Step 2: Create a Python Environment
Keep vLLM isolated. It has strict dependency requirements that will conflict with system packages.
python3 -m venv ~/vllm-env
source ~/vllm-env/bin/activate

# Confirm you're in the right env
which python
# Should output: /home/youruser/vllm-env/bin/python
Step 3: Install vLLM
Install the version that matches your CUDA toolkit. For CUDA 12.x (most modern setups):
pip install vllm
For CUDA 11.8 (older drivers, common on RTX 2000/3000 series):
pip install vllm --extra-index-url https://download.pytorch.org/whl/cu118
Why this matters: vLLM bundles a specific PyTorch build. If it doesn't match your CUDA version, inference will either crash or fall back to CPU silently.
# Verify the install worked
python -c "import vllm; print(vllm.__version__)"
Expected: A version string like 0.6.x — no errors.
If it fails:
No module named 'vllm': Your virtual env isn't activated — runsource ~/vllm-env/bin/activate- CUDA version mismatch errors during install: Use the
--extra-index-urlapproach above for your specific CUDA version
Step 4: Download a Model
vLLM pulls models from Hugging Face. For home lab use, a 7B parameter model is a good starting point — it fits in 8GB VRAM with 4-bit quantization, or 14GB VRAM at full precision.
# Install HF CLI
pip install huggingface_hub

# Download a model (this example uses Mistral 7B Instruct)
huggingface-cli download mistralai/Mistral-7B-Instruct-v0.3 \
  --local-dir ~/models/mistral-7b-instruct
If you're on 8GB VRAM (RTX 3070/4060 Ti range), use a GGUF-quantized model instead and point vLLM at it — or consider using --quantization awq with a pre-quantized AWQ variant.
Step 5: Start the vLLM Server
vLLM exposes an OpenAI-compatible REST API out of the box.
python -m vllm.entrypoints.openai.api_server \
  --model ~/models/mistral-7b-instruct \
  --host 0.0.0.0 \
  --port 8000 \
  --max-model-len 4096
Flag breakdown:
--host 0.0.0.0— binds to all interfaces so other devices on your network can reach it--max-model-len 4096— caps context length to reduce VRAM usage; increase if you have headroom- Add
--gpu-memory-utilization 0.90to let vLLM use 90% of VRAM (default is 0.90 already, lower it if you're running out)
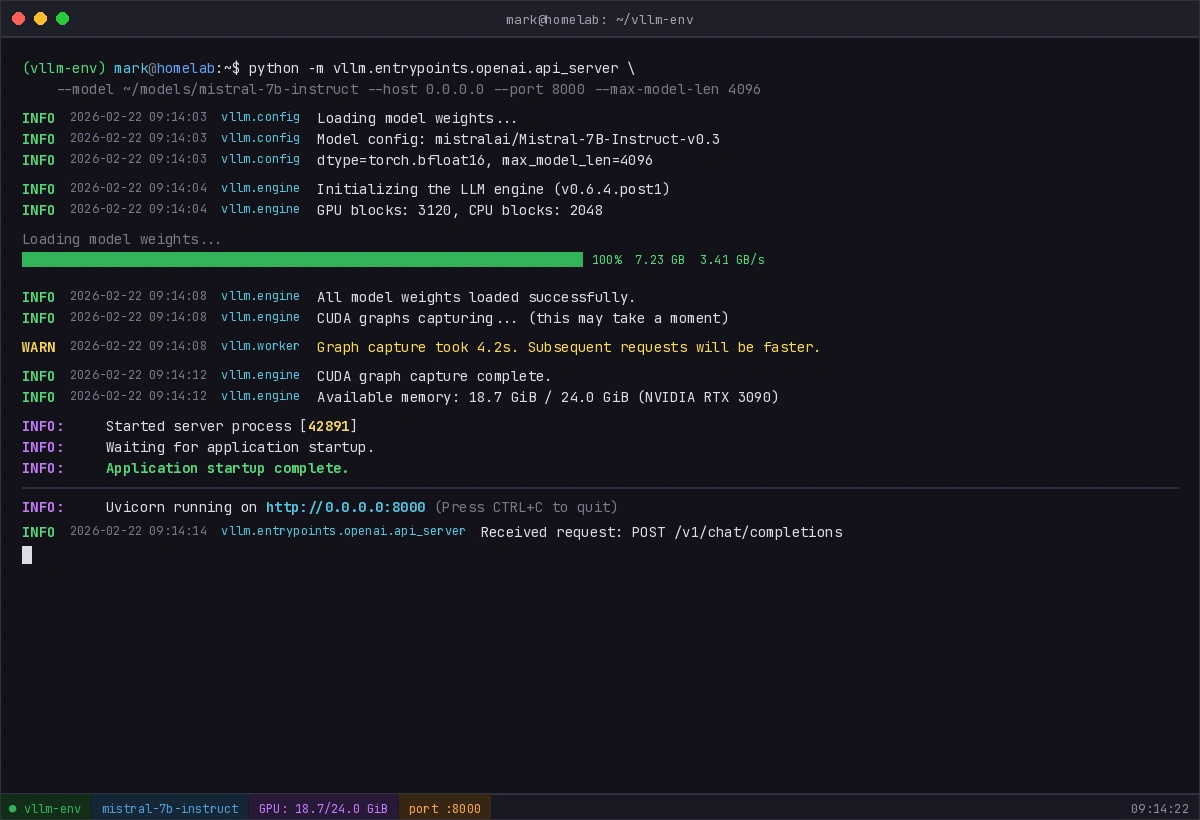 You should see model loading logs followed by "Application startup complete."
If it fails:
CUDA out of memory: Add--max-model-len 2048or--gpu-memory-utilization 0.80ValueError: The model's max seq len is larger than the maximum...: Explicitly set--max-model-lento a value lower than what the error reports
Verification
With the server running, test it from another terminal (or another machine on your network):
curl http://localhost:8000/v1/chat/completions \
  -H "Content-Type: application/json" \
  -d '{
    "model": "mistral-7b-instruct",
    "messages": [{"role": "user", "content": "Say hello in one sentence."}],
    "max_tokens": 50
  }'
You should see: A JSON response with a choices array containing the model's reply. Response time will vary — expect 2–10 seconds for the first token on a home GPU.
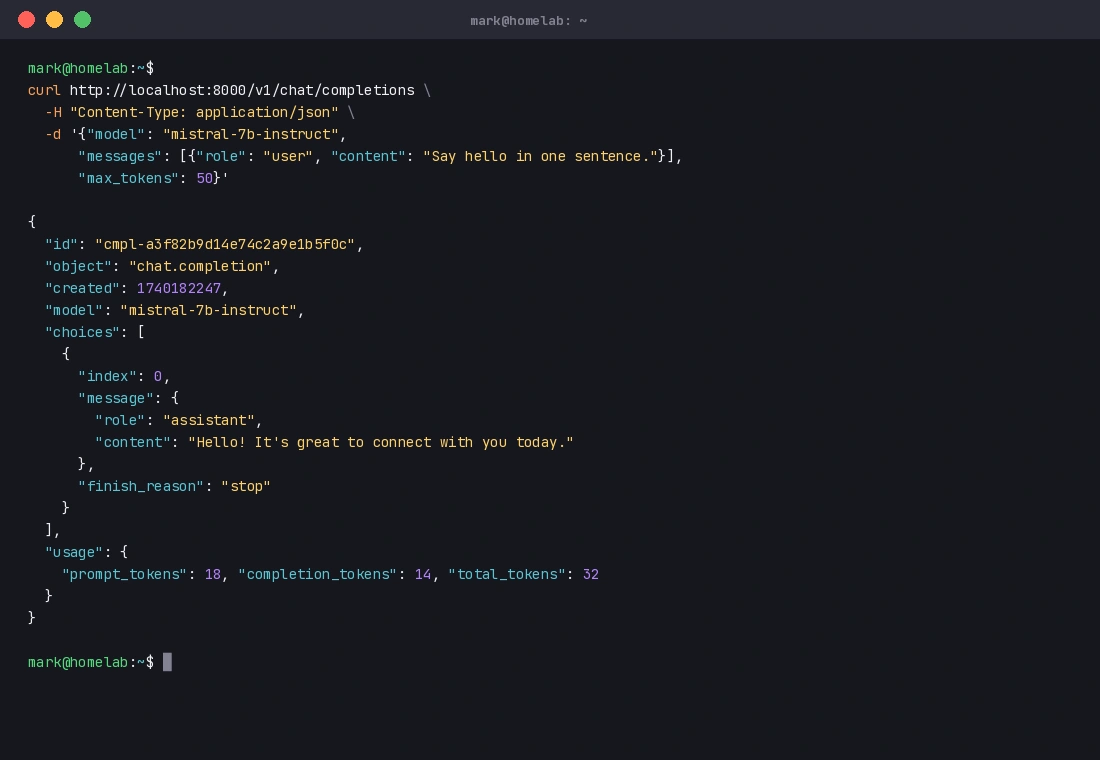 A valid JSON response like this means your server is working correctly.
What You Learned
- vLLM requires CUDA 7.0+ compute capability — check before starting
- Matching your PyTorch/CUDA build to vLLM's install is the most common failure point
- The
--max-model-lenflag is your best lever for managing VRAM on consumer GPUs - vLLM's OpenAI-compatible API means any tool built for the OpenAI API (LangChain, Open WebUI, etc.) will work against your local server without code changes
Limitation: vLLM is optimized for throughput, not single-request latency. For a solo home lab setup, llama.cpp may feel snappier on smaller models. vLLM shines when you're serving multiple concurrent requests.
When NOT to use vLLM: If you don't have a CUDA-capable GPU, use llama.cpp with CPU inference instead.
Tested on vLLM 0.6.x, CUDA 12.2, Ubuntu 22.04, RTX 3090