Problem: PX4 Doesn't Know Your Vehicle
You built a drone or fixed-wing that doesn't match any stock PX4 airframe. QGroundControl shows nothing useful in the airframe list, and generic presets give you wrong mixer outputs or broken parameter defaults.
You'll learn:
- Where PX4 v1.16 stores airframe definitions and why the structure changed
- How to add your own airframe file without editing upstream configs
- How to load and verify it in QGroundControl
Time: 20 min | Level: Beginner
Why This Happens
PX4 uses a per-airframe shell script to set startup parameters and assign mixer outputs. If your vehicle isn't in the default library, the flight controller either falls back to a generic profile (wrong motor order, bad PIDs) or refuses to arm entirely.
In v1.16, airframe files moved from ROMFS/px4fmu_common/init.d/ into a CMake-managed structure under src/lib/airframes/. You can't just drop a file in — you need to register it properly.
Common symptoms:
- QGC airframe page shows "Generic" with no matching preset
- Motors spin in wrong order during pre-arm checks
- Default PID gains cause immediate oscillation on first flight
 No matching entry — this is the starting point
Solution
Step 1: Clone PX4 and Check Your Version
git clone https://github.com/PX4/PX4-Autopilot.git --branch v1.16.0 --depth 1
cd PX4-Autopilot
git submodule update --init --recursive
Confirm the airframe directory exists where v1.16 expects it:
ls src/lib/airframes/
Expected: You should see numbered folders like 4001_quad_x, 2100_standard_plane, etc.
If it fails:
- Directory missing: You may be on an older branch — run
git checkout v1.16.0and re-run submodule init
Step 2: Pick a Base Airframe Number
PX4 groups airframes by number range. Pick one that matches your vehicle type, then choose an unused number in that range:
| Range | Type |
|---|---|
| 1xxx | Plane |
| 2xxx | VTOL |
| 4xxx | Multirotor |
| 6xxx | Ground rover |
For a custom quadcopter, use something in 4900–4999 (reserved for custom/community frames):
# Check nothing is using your chosen number
grep -r "4901" src/lib/airframes/
Expected: No output means the number is free.
Step 3: Create Your Airframe File
Create a new directory and shell script for your airframe:
mkdir -p src/lib/airframes/4901_my_quad_x
touch src/lib/airframes/4901_my_quad_x/4901_my_quad_x.px4board
Now write the airframe init script:
cat > src/lib/airframes/4901_my_quad_x/init.d << 'EOF'
#!/bin/sh
# Custom quad-X airframe
# Airframe ID: 4901

. ${R}etc/init.d/rc.mc_defaults  # Load multirotor defaults

# --- Vehicle geometry ---
param set-default CA_ROTOR_COUNT 4
param set-default CA_ROTOR0_PX  0.15   # Front-right X offset (meters)
param set-default CA_ROTOR0_PY -0.15
param set-default CA_ROTOR1_PX -0.15   # Rear-left
param set-default CA_ROTOR1_PY  0.15
param set-default CA_ROTOR2_PX  0.15   # Front-left
param set-default CA_ROTOR2_PY  0.15
param set-default CA_ROTOR3_PX -0.15   # Rear-right
param set-default CA_ROTOR3_PY -0.15

# --- Spin directions (1=CW, -1=CCW) ---
param set-default CA_ROTOR0_KM -0.05
param set-default CA_ROTOR1_KM -0.05
param set-default CA_ROTOR2_KM  0.05
param set-default CA_ROTOR3_KM  0.05

# --- Tune these after maiden flight ---
param set-default MC_ROLLRATE_P  0.15
param set-default MC_PITCHRATE_P 0.15
param set-default MC_YAWRATE_P   0.20
EOF
Why rc.mc_defaults: It loads safe baseline values for all multirotor parameters so you only override what's different on your frame.
Step 4: Register the Airframe in CMake
Open the airframe list file:
nano src/lib/airframes/CMakeLists.txt
Find the section for multirotors (search for 4xxx) and add your entry:
# Custom airframes
px4_add_airframe(
    AIRFRAME 4901
    NAME "My Custom Quad X"
    TYPE multirotor
    INIT_FILE 4901_my_quad_x/init.d
)
Save and close.
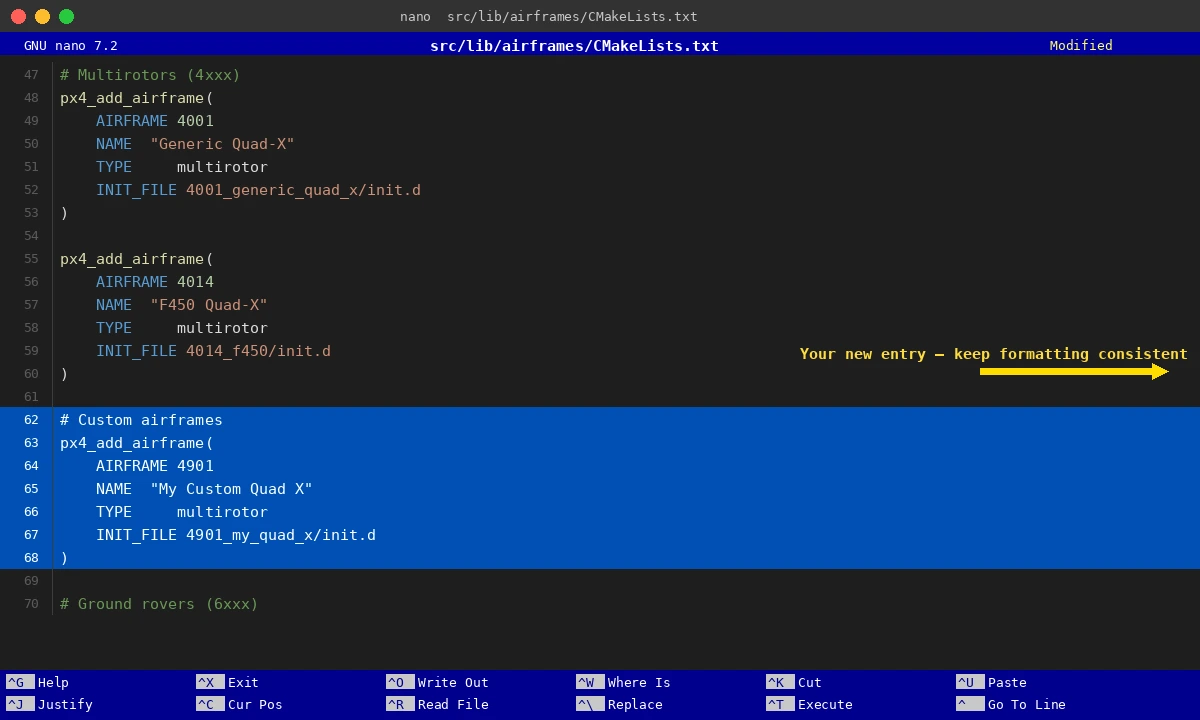 Your new entry goes in the multirotors block — keep the formatting consistent
Step 5: Build and Flash
# Build for Pixhawk 6x (adjust board for your hardware)
make px4_fmu-v6x_default

# Flash via USB
make px4_fmu-v6x_default upload
Expected: Build completes with no errors. Flash tool reports "Board is already in bootloader" or "Programming" then success.
If it fails:
- CMake configure error: Check indentation in CMakeLists.txt — CMake is whitespace-sensitive in function calls
- **
init.dnot found:** Confirm the file path inINIT_FILE` exactly matches your directory structure - USB not detected: Install
udevrules —Tools/setup/ubuntu.shhandles this on Linux
Verification
Power up the flight controller and connect QGroundControl. Navigate to Vehicle Setup → Airframe.
# On the flight controller's MAVLink shell, confirm the airframe loaded:
param show SYS_AUTOSTART
You should see: SYS_AUTOSTART = 4901
If QGC still shows "Generic," click Apply and Restart after selecting your new airframe from the list — it won't take effect until reboot.
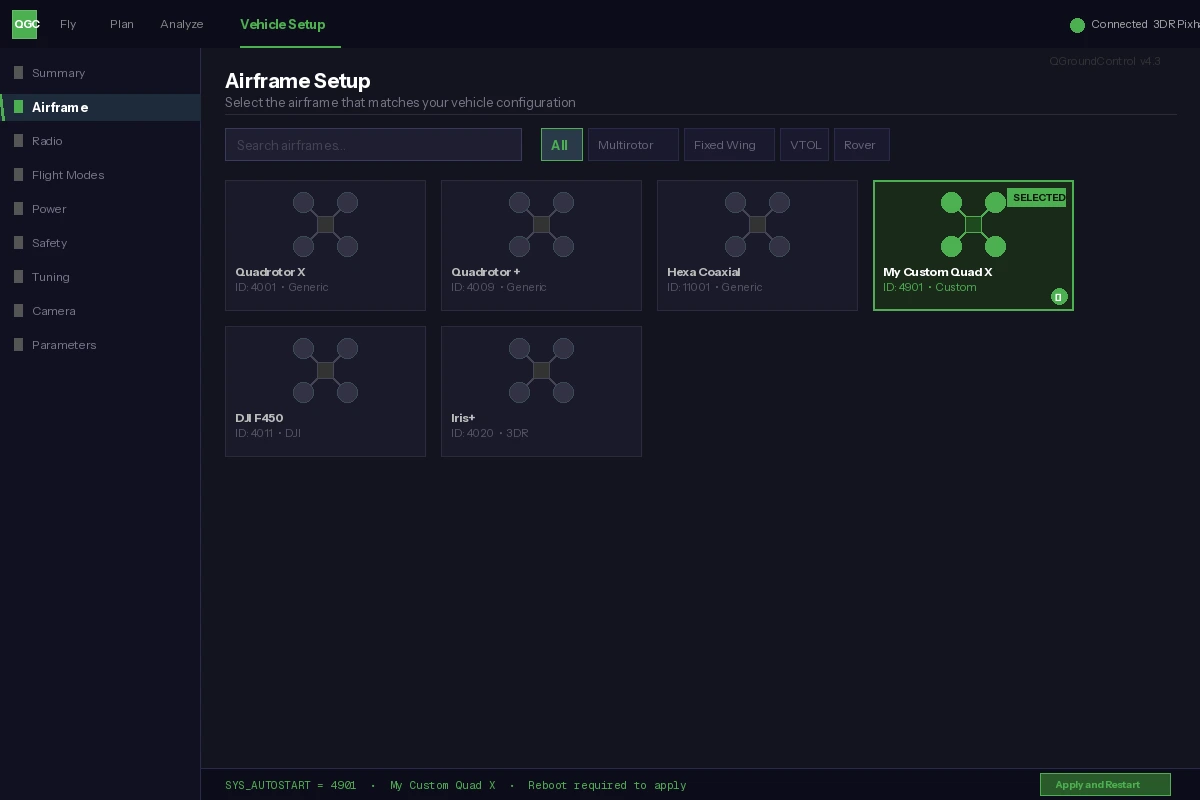 Your airframe name appears and SYS_AUTOSTART matches your ID
What You Learned
- PX4 v1.16 requires CMake registration — dropping a file alone won't work
- The
4900–4999number range is safe for custom frames without colliding with upstream rc.mc_defaultssaves you from setting 50+ parameters manually
Limitation: This approach requires rebuilding firmware. If you need airframe switching without reflashing, look into PX4's parameter-only configuration via QGC's advanced parameter editor instead — though you lose the clean per-airframe defaults.
When NOT to use this: If an existing airframe is 90% right, override only the differing parameters via QGC rather than creating a new airframe. Save custom airframes for significantly different geometries or motor counts.
Tested on PX4 Autopilot v1.16.0, Pixhawk 6X, QGroundControl v4.3, Ubuntu 24.04