Problem: Your AI Agent Runs Locally, Not in Production
You've built an AI agent that works perfectly on your machine. Now it needs to be always-on, scalable, and not dependent on your laptop. AWS ECS with Fargate is the fastest path there — no servers to manage, pay only for what you use.
You'll learn:
- How to containerize an AI agent with Docker
- How to push the image to ECR and create an ECS task definition
- How to run and expose your agent as a live HTTPS endpoint
Time: 45 min | Level: Intermediate
Why This Happens
Running an AI agent locally means it dies when you close your Terminal. You need a runtime that handles uptime, scaling, and networking for you. ECS Fargate gives you serverless containers — you define what to run and AWS handles the where and how.
The three things people get stuck on: IAM permissions, task definition networking, and forgetting to expose the right port in the security group.
Common symptoms before fixing this:
- Agent only works when you run it manually
- No HTTPS endpoint to call from other services
- No way to scale under load
Solution
Step 1: Containerize Your Agent
Your agent needs a Dockerfile. Here's a minimal one for a FastAPI-based agent using an LLM SDK:
FROM python:3.12-slim

WORKDIR /app

COPY requirements.txt .
RUN pip install --no-cache-dir -r requirements.txt

COPY . .

# Expose the port ECS will forward traffic to
EXPOSE 8080

CMD ["uvicorn", "main:app", "--host", "0.0.0.0", "--port", "8080"]
And a minimal main.py to verify the container works:
from fastapi import FastAPI
from pydantic import BaseModel
import anthropic  # or openai, langchain, etc.

app = FastAPI()
client = anthropic.Anthropic()  # reads ANTHROPIC_API_KEY from env

class AgentRequest(BaseModel):
    message: str

@app.post("/run")
async def run_agent(req: AgentRequest):
    # Keep secrets in ECS task definition environment variables — never bake into image
    response = client.messages.create(
        model="claude-sonnet-4-6",
        max_tokens=1024,
        messages=[{"role": "user", "content": req.message}]
    )
    return {"result": response.content[0].text}

@app.get("/health")
async def health():
    return {"status": "ok"}
Build and test locally before pushing:
docker build -t my-ai-agent .
docker run -p 8080:8080 -e ANTHROPIC_API_KEY=your_key my-ai-agent

# In another terminal
curl -X POST http://localhost:8080/run \
  -H "Content-Type: application/json" \
  -d '{"message": "Hello, agent"}'
Expected: JSON response with your agent's reply.
If it fails:
- Port already in use: Change
-p 8081:8080to map to a free local port - ModuleNotFoundError: Make sure
requirements.txtincludes all deps
Step 2: Push Image to Amazon ECR
Create a private ECR repository and push your image:
# Set your region and AWS account ID
REGION=us-east-1
ACCOUNT_ID=$(aws sts get-caller-identity --query Account --output text)
REPO=my-ai-agent

# Create the repo (one-time)
aws ecr create-repository --repository-name $REPO --region $REGION

# Authenticate Docker with ECR
aws ecr get-login-password --region $REGION \
  | docker login --username AWS \
    --password-stdin $ACCOUNT_ID.dkr.ecr.$REGION.amazonaws.com

# Tag and push
docker tag my-ai-agent:latest $ACCOUNT_ID.dkr.ecr.$REGION.amazonaws.com/$REPO:latest
docker push $ACCOUNT_ID.dkr.ecr.$REGION.amazonaws.com/$REPO:latest
Expected: latest: digest: sha256:... confirmation in your terminal.
If it fails:
denied: Your authorization token has expired: Re-run theget-login-passwordcommand — ECR tokens expire after 12 hoursno basic credentials: Make sure your AWS CLI is configured withaws configure
Step 3: Create the ECS Task Definition
Save this as task-definition.json. Replace the placeholders with your account ID and region:
{
  "family": "my-ai-agent",
  "networkMode": "awsvpc",
  "requiresCompatibilities": ["FARGATE"],
  "cpu": "512",
  "memory": "1024",
  "executionRoleArn": "arn:aws:iam::ACCOUNT_ID:role/ecsTaskExecutionRole",
  "containerDefinitions": [
    {
      "name": "agent",
      "image": "ACCOUNT_ID.dkr.ecr.REGION.amazonaws.com/my-ai-agent:latest",
      "portMappings": [
        { "containerPort": 8080, "protocol": "tcp" }
      ],
      "environment": [
        {
          "name": "ANTHROPIC_API_KEY",
          "value": "your-api-key-here"
        }
      ],
      "logConfiguration": {
        "logDriver": "awslogs",
        "options": {
          "awslogs-group": "/ecs/my-ai-agent",
          "awslogs-region": "us-east-1",
          "awslogs-stream-prefix": "ecs"
        }
      },
      "essential": true
    }
  ]
}
Security note: For production, use AWS Secrets Manager instead of plain
environmentvariables. Store your API key there and reference it withsecretsin the task definition. This prevents keys from appearing in the ECS console.
Register the task definition:
# Create the CloudWatch log group first
aws logs create-log-group --log-group-name /ecs/my-ai-agent --region $REGION

# Register the task definition
aws ecs register-task-definition \
  --cli-input-json file://task-definition.json \
  --region $REGION
If it fails:
ecsTaskExecutionRole does not exist: Create it in IAM with theAmazonECSTaskExecutionRolePolicymanaged policy attached
Step 4: Create an ECS Cluster and Run the Service
# Create cluster (Fargate, so no EC2 needed)
aws ecs create-cluster --cluster-name ai-agents --region $REGION

# Get your default VPC subnet and security group IDs
SUBNET=$(aws ec2 describe-subnets \
  --filters "Name=default-for-az,Values=true" \
  --query "Subnets[0].SubnetId" --output text)

SG=$(aws ec2 describe-security-groups \
  --filters "Name=group-name,Values=default" \
  --query "SecurityGroups[0].GroupId" --output text)

# Open port 8080 on the security group so traffic can reach the container
aws ec2 authorize-security-group-ingress \
  --group-id $SG \
  --protocol tcp \
  --port 8080 \
  --cidr 0.0.0.0/0 \
  --region $REGION

# Run the service (1 task, always-on)
aws ecs create-service \
  --cluster ai-agents \
  --service-name my-ai-agent-svc \
  --task-definition my-ai-agent \
  --desired-count 1 \
  --launch-type FARGATE \
  --network-configuration "awsvpcConfiguration={subnets=[$SUBNET],securityGroups=[$SG],assignPublicIp=ENABLED}" \
  --region $REGION
If it fails:
InvalidParameterException: The provided target group...: Skip ALB for now —assignPublicIp=ENABLEDgives the task a direct public IP for testing- Task keeps stopping: Check CloudWatch logs at
/ecs/my-ai-agentfor the crash reason
Verification
Find your task's public IP and call it:
# Get the task ARN
TASK_ARN=$(aws ecs list-tasks \
  --cluster ai-agents \
  --service-name my-ai-agent-svc \
  --query "taskArns[0]" --output text)

# Get the ENI (network interface) attached to the task
ENI=$(aws ecs describe-tasks \
  --cluster ai-agents \
  --tasks $TASK_ARN \
  --query "tasks[0].attachments[0].details[?name=='networkInterfaceId'].value" \
  --output text)

# Get the public IP from the ENI
PUBLIC_IP=$(aws ec2 describe-network-interfaces \
  --network-interface-ids $ENI \
  --query "NetworkInterfaces[0].Association.PublicIp" \
  --output text)

echo "Agent running at: http://$PUBLIC_IP:8080"

# Test the health check
curl http://$PUBLIC_IP:8080/health

# Test the agent
curl -X POST http://$PUBLIC_IP:8080/run \
  -H "Content-Type: application/json" \
  -d '{"message": "What is 2 + 2?"}'
You should see: {"status":"ok"} from health, and a JSON response with your agent's answer.
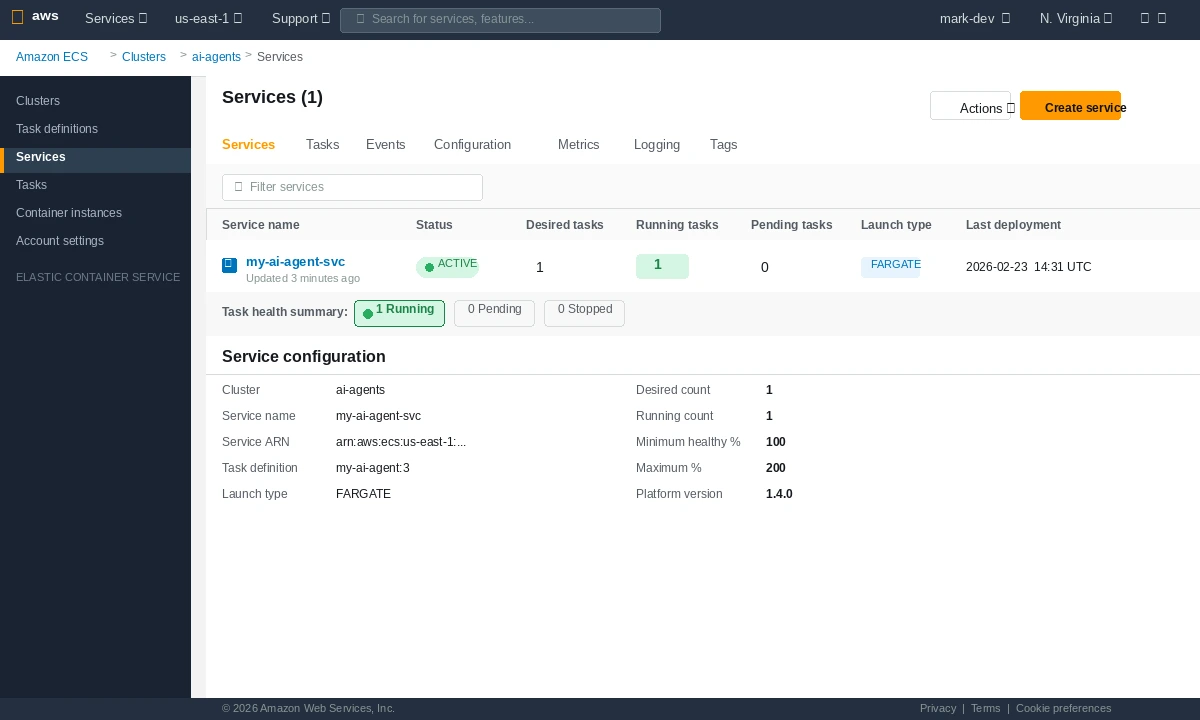 ECS console showing your service with 1/1 tasks running — green means you're live
What You Learned
- Fargate removes EC2 management — you pay per vCPU-second, not per idle instance
- Task definitions are versioned — every
register-task-definitioncall creates a new revision assignPublicIp=ENABLEDis fine for dev/testing; add an Application Load Balancer for production HTTPS with a stable endpoint- Secrets in plain
environmentfields are visible in the ECS console — always migrate to AWS Secrets Manager before going to production - The
ecsTaskExecutionRoleis separate from your app's permissions — it's what ECS uses to pull the image and write logs
Limitation: A single Fargate task has no auto-scaling or load balancing. For production traffic, add an ALB and an ECS auto-scaling policy based on CPU or request count.
When NOT to use this setup: If your agent runs long multi-step workflows (> 5 minutes per request), consider AWS Batch or Step Functions instead — ECS services are optimized for persistent HTTP workloads, not long-running jobs.
Tested on AWS CLI 2.x, Docker 27, Python 3.12, Fargate platform version 1.4.0