Problem: Wiring OpenAI Assistants into Flowise Without Breaking Thread Memory
OpenAI Assistants API manages conversation history server-side using threads. Flowise has its own session model. If you connect them wrong, every message starts a fresh thread — users lose context mid-conversation.
You'll learn:
- How to add your OpenAI API key and create an Assistant node in Flowise
- How to configure tools (Code Interpreter, File Search, custom Functions)
- How to preserve thread memory across sessions using Flowise's built-in thread ID mapping
Time: 20 min | Difficulty: Intermediate
Why This Is Tricky
Flowise's default chat nodes manage memory locally — they store history in a buffer or vector store and inject it into each prompt. OpenAI Assistants work differently: the API owns the thread and retrieves history automatically using a thread_id.
If you use a standard LLM node to call GPT-4o, you bypass the Assistants API entirely and lose access to its tools (Code Interpreter, File Search, function calling). You need the dedicated OpenAI Assistant node and a strategy for persisting thread_id per user session.
Symptoms when it's misconfigured:
- Each message returns a response with no memory of the previous turn
- Tools like Code Interpreter never activate
400: No thread founderrors in the Flowise logs
Solution
Step 1: Install or Verify Flowise Version
The OpenAI Assistant node requires Flowise 2.1.0 or later. Check your version:
# If running via npx
npx flowise --version

# If running via Docker
docker exec <container_name> npx flowise --version
Expected output: flowise@2.x.x or higher.
If you're on an older version, upgrade:
# npx install
npm install -g flowise@latest

# Docker — pull the latest image and recreate the container
docker pull flowiseai/flowise:latest
Step 2: Add Your OpenAI Credential in Flowise
- Open Flowise at
http://localhost:3000 - Navigate to Credentials → Add Credential
- Select OpenAI API from the dropdown
- Paste your API key from platform.openai.com/api-keys
- Click Save
 Caption: Add the credential once — all OpenAI nodes in the workspace will reference it
If your key fails validation:
- Confirm it starts with
sk-proj-(new format) orsk-(legacy) - Check that your OpenAI account has API access enabled, not just ChatGPT Plus
Step 3: Create a New Chatflow and Add the OpenAI Assistant Node
- Go to Chatflows → Add New
- In the node panel, search for OpenAI Assistant
- Drag it onto the canvas
- Connect its output to a Chat Output node (or leave it as the terminal node — Flowise handles this automatically)
Configure the node:
| Field | Value |
|---|---|
| Credential | Select the key you added in Step 2 |
| Assistant ID | Leave blank to create a new assistant, or paste an existing ID |
| Model | gpt-4o (recommended) or gpt-4o-mini for lower cost |
| Instructions | Your system prompt — defines the assistant's persona and behavior |
If you leave Assistant ID blank, Flowise creates a new Assistant in your OpenAI account when you first run the flow. You can find it later at platform.openai.com/assistants.
Step 4: Enable Tools on the Assistant
Inside the OpenAI Assistant node, expand the Tools section. Three tools are available:
Code Interpreter — lets the assistant write and run Python to answer math, data, or file processing questions.
Toggle: Code Interpreter → ON
File Search — enables retrieval over uploaded files (PDFs, DOCX, etc.). You'll need to upload files via the OpenAI platform or the Flowise Upload File node.
Toggle: File Search → ON
Function Calling — lets the assistant call your own APIs. Add functions as JSON schema in the Functions field:
{
  "name": "get_order_status",
  "description": "Look up the status of a customer order by order ID",
  "parameters": {
    "type": "object",
    "properties": {
      "order_id": {
        "type": "string",
        "description": "The customer's order ID, e.g. ORD-12345"
      }
    },
    "required": ["order_id"]
  }
}
When the assistant calls this function, Flowise surfaces the call as a node output you can wire to an HTTP Request node or custom code node to fulfill it.
Step 5: Configure Thread Memory Persistence
This is where most integrations break. By default, Flowise creates a new thread_id for every request. You need to tell it to reuse threads per session.
In the OpenAI Assistant node, find Thread ID under the Additional Parameters section.
Set it to use Flowise's session variable:
Thread ID field: {{ $sessionId }}
This maps one Flowise session (one browser tab or API caller) to one OpenAI thread. When the same session sends a second message, the assistant continues the existing thread instead of starting fresh.
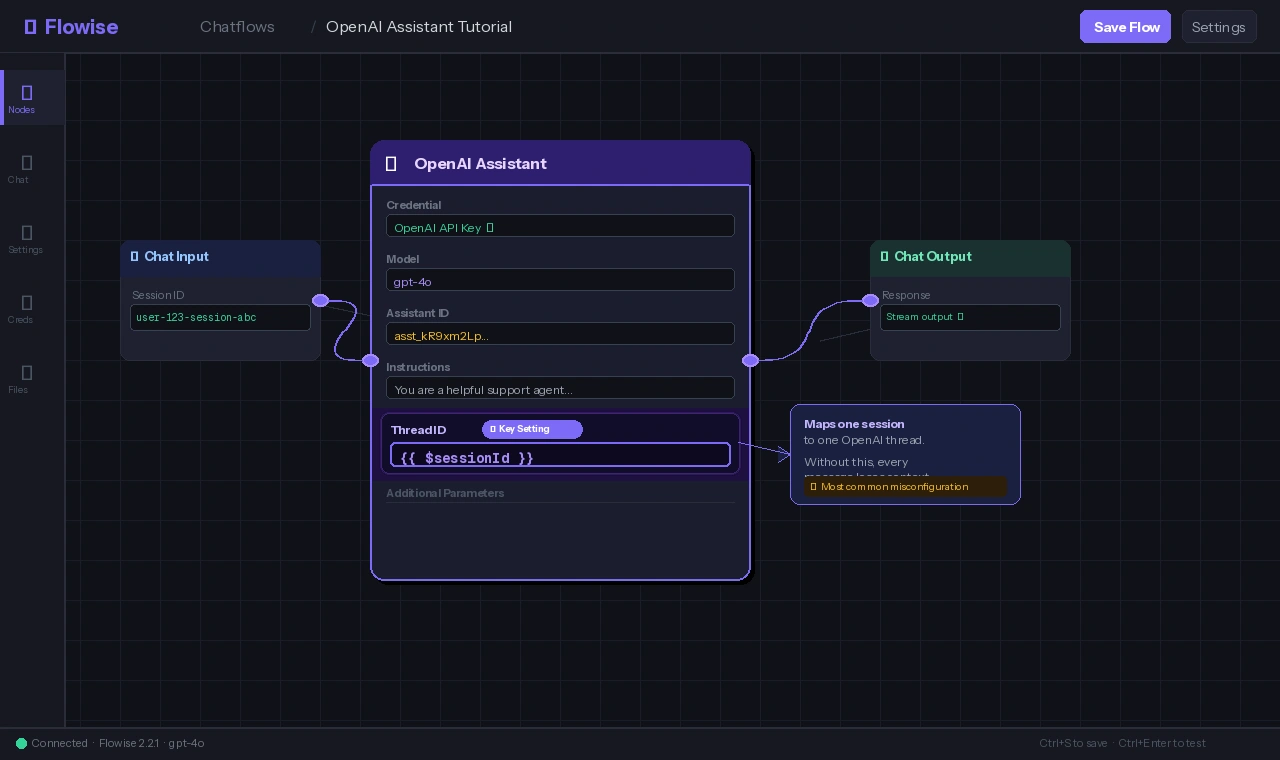 Caption: The
 {{ $sessionId }} variable is the key to persistent memory — without it, every message is stateless
If you're calling Flowise via API (not the embed chat UI), pass sessionId explicitly in your request body:
curl -X POST http://localhost:3000/api/v1/prediction/<chatflow_id> \
  -H "Content-Type: application/json" \
  -d '{
    "question": "What was the order I asked about earlier?",
    "sessionId": "user-123-session-abc"
  }'
Use a consistent, user-scoped value for sessionId — a hashed user ID works well. Do not use a random UUID per request.
Step 6: Save and Test the Chatflow
- Click Save in the top-right corner
- Open the Chat panel (speech bubble icon)
- Send a first message:
My name is Alex - Send a second message:
What's my name?
Expected behavior: The assistant answers "Alex" — it retrieved the thread history from OpenAI.
If the second message returns "I don't know your name," thread persistence is not working. Re-check Step 5.
Verification
Test the full tool chain with a Code Interpreter prompt:
"Calculate the compound interest on $10,000 at 7% annual rate for 20 years, then show a year-by-year breakdown."
You should see: The assistant activate Code Interpreter, run Python internally, and return a formatted table — not just a formula.
To confirm threads are reusing correctly, check your OpenAI usage dashboard:
- Go to platform.openai.com/usage
- Filter by Assistants API
- A healthy integration shows multiple messages under the same
thread_id, not a new thread per message
 Caption: Multiple turns on one thread means memory is working — each new thread in the list represents a different user session
What You Learned
- The OpenAI Assistant node in Flowise is separate from the standard LLM node — it's required for Assistants API features like Code Interpreter and File Search
- Thread memory only persists if you bind
Thread IDto{{ $sessionId }}— the most common misconfiguration - Function calling lets you extend the assistant with live data by wiring the function output to HTTP Request or code nodes
- Assistants created via Flowise appear in your OpenAI dashboard and count against your storage quota for File Search
Limitation: OpenAI Assistants API adds latency compared to direct chat completions — expect 1–3s extra per turn while the API polls for run completion. For latency-sensitive apps, use a standard GPT-4o node with Flowise's buffer memory instead.
Tested on Flowise 2.2.1, OpenAI gpt-4o (2025-01-preview), Node.js 20 LTS, Ubuntu 24.04 and macOS Sequoia