Problem: Your Flowise Chatbot Lives in the UI — Not on Your Site
You built a chatflow in Flowise. It works great in the canvas. Now you need it running on your website, app, or internal tool — and you're not sure whether to use the REST API, the iframe embed, or the JS widget.
Each option has different tradeoffs for auth, customization, and streaming. Picking the wrong one costs time.
You'll learn:
- How to call the Flowise
/api/v1/predictionendpoint directly - How to embed via the JS widget with optional API key auth
- How to pass variables and session IDs for multi-turn conversations
Time: 20 min | Difficulty: Intermediate
Why This Needs a Decision
Flowise gives you three embedding methods:
| Method | Best for | Auth support | Streaming |
|---|---|---|---|
REST API (/prediction) | Custom UI, backend calls | API key header | ✅ SSE |
| JS Widget (CDN script) | Drop-in chatbot bubble | API key in config | ✅ |
| iFrame | Zero-JS sites, sandboxed embeds | Via URL param | ❌ |
If you're building a custom frontend or calling from a backend service, use the REST API. If you want a chatbot bubble in 5 minutes, use the JS widget.
Step 1: Get Your Chatflow ID
Every chatflow exposes a unique ID. You need this for every method.
- Open Flowise and go to your chatflow
- Click API Endpoint in the top toolbar
- Copy the Chatflow ID — it looks like
a1b2c3d4-e5f6-7890-abcd-ef1234567890
Alternatively, grab it from the URL while the chatflow is open:
http://localhost:3000/chatflows/a1b2c3d4-e5f6-7890-abcd-ef1234567890
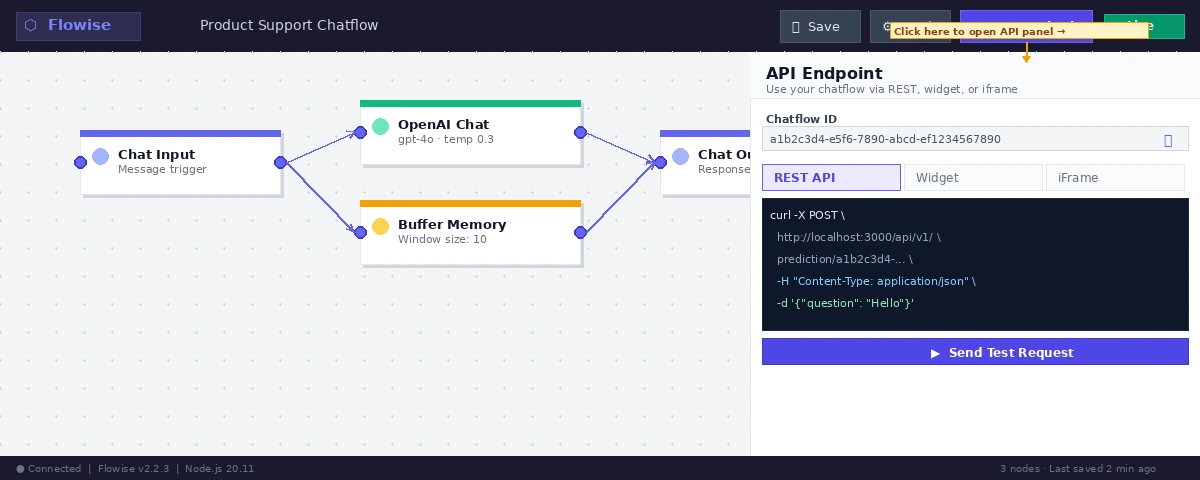 Caption: The API Endpoint button is in the top-right of every chatflow — it shows all three integration methods.
Step 2: Call the REST API Directly
The prediction endpoint accepts a POST request with a question field.
# Basic call — no auth (works if Flowise has no API key set)
curl -X POST \
  http://localhost:3000/api/v1/prediction/a1b2c3d4-e5f6-7890-abcd-ef1234567890 \
  -H "Content-Type: application/json" \
  -d '{"question": "What is your return policy?"}'
Expected output:
{
  "text": "Our return policy allows returns within 30 days...",
  "question": "What is your return policy?",
  "chatId": "session-uuid-here"
}
With API Key Auth
If you've set an API key in Flowise (Settings → API Keys), include it as a header:
# Always use the Authorization header — never put the key in the URL
curl -X POST \
  http://localhost:3000/api/v1/prediction/a1b2c3d4-e5f6-7890-abcd-ef1234567890 \
  -H "Content-Type: application/json" \
  -H "Authorization: Bearer fl-your-api-key-here" \
  -d '{"question": "What are your shipping options?"}'
If it fails:
401 Unauthorized→ API key is wrong or missing theBearerprefix404 Not Found→ Chatflow ID is wrong or the chatflow isn't deployed (toggle Publish in Flowise)500 Internal Server Error→ Check Flowise logs; usually a missing LLM credential
Step 3: Maintain Conversation History with Session IDs
Without a sessionId, every request is stateless — the model has no memory of prior turns. Pass a consistent ID to maintain context.
// Use a stable session ID per user (e.g., user UUID or browser fingerprint)
const sessionId = crypto.randomUUID(); // Store this in localStorage per user

const response = await fetch(
  "http://localhost:3000/api/v1/prediction/a1b2c3d4-e5f6-7890-abcd-ef1234567890",
  {
    method: "POST",
    headers: {
      "Content-Type": "application/json",
      "Authorization": "Bearer fl-your-api-key-here",
    },
    body: JSON.stringify({
      question: "What about overnight shipping?",
      sessionId: sessionId,       // Ties this message to a conversation thread
      overrideConfig: {
        temperature: 0.3,         // Optional: override chatflow settings per request
      },
    }),
  }
);

const data = await response.json();
console.log(data.text);
Step 4: Enable Streaming Responses
For chat UIs, streaming makes responses feel faster. Flowise uses Server-Sent Events (SSE).
// Switch to /api/v1/chatmessage for streaming
const eventSource = new EventSource(
  `http://localhost:3000/api/v1/chatmessage/a1b2c3d4-e5f6-7890-abcd-ef1234567890` +
  `?question=${encodeURIComponent("What is your return policy?")}&sessionId=${sessionId}`
);

let fullResponse = "";

eventSource.onmessage = (event) => {
  if (event.data === "[DONE]") {
    eventSource.close();
    console.log("Final:", fullResponse);
    return;
  }
  // Each chunk is a partial token — append to UI as it arrives
  fullResponse += event.data;
  document.getElementById("chat-output").textContent = fullResponse;
};

eventSource.onerror = () => {
  eventSource.close();
};
Note: SSE doesn't support custom headers, so API key auth isn't possible with EventSource directly. For authenticated streaming, use the Flowise JS widget (Step 5) or proxy through your own backend.
Step 5: Embed the JS Widget (Fastest Option)
The JS widget adds a floating chatbot bubble to any page. Paste this before </body>:
<script type="module">
  import Chatbot from "https://cdn.jsdelivr.net/npm/flowise-embed/dist/web.js";

  Chatbot.init({
    chatflowid: "a1b2c3d4-e5f6-7890-abcd-ef1234567890",
    apiHost: "http://localhost:3000",  // Change to your Flowise host in production

    chatflowConfig: {
      // Optional: override chatflow-level settings
      temperature: 0.5,
    },

    theme: {
      button: {
        backgroundColor: "#1a56db",
        size: 48,
        iconColor: "white",
      },
      chatWindow: {
        title: "Support Chat",
        welcomeMessage: "Hi! How can I help you today?",
        backgroundColor: "#ffffff",
        height: 700,
        width: 400,
      },
    },
  });
</script>
Add API Key Auth to the Widget
<script type="module">
  import Chatbot from "https://cdn.jsdelivr.net/npm/flowise-embed/dist/web.js";

  Chatbot.init({
    chatflowid: "a1b2c3d4-e5f6-7890-abcd-ef1234567890",
    apiHost: "https://your-flowise-domain.com",

    // API key protects unauthorized use from other origins
    // Use a read-only key scoped to this chatflow only
    apiKey: "fl-your-api-key-here",

    theme: {
      chatWindow: {
        title: "Ask Us Anything",
        welcomeMessage: "Hello! Ask me anything about our products.",
      },
    },
  });
</script>
⚠️ Security note: The API key in a public JS bundle is visible to anyone who views source. Create a separate read-only key in Flowise (Settings → API Keys → Add New Key) scoped only for this chatflow. Rotate it if exposed.
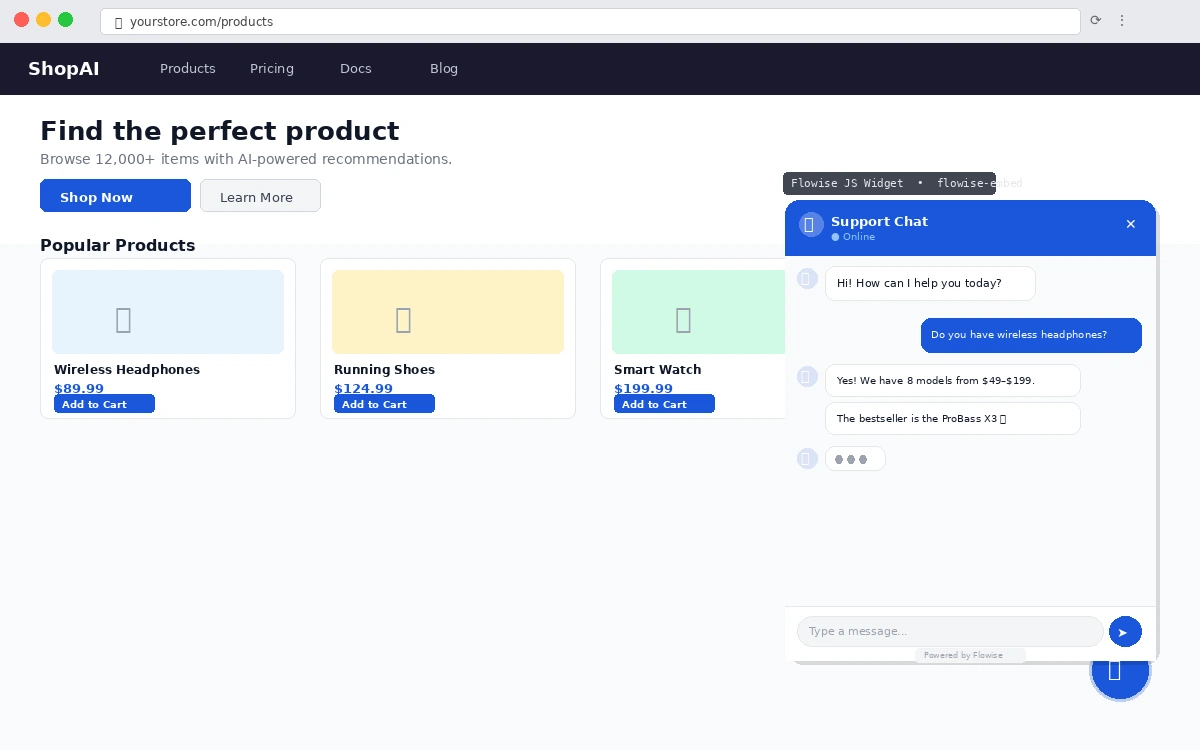 Caption: The JS widget renders a floating bubble — click to expand the chat window. Title, colors, and welcome message are all configurable.
Step 6: Use the iFrame Embed (No JavaScript)
For static sites, email newsletters, or sandboxed contexts where JavaScript is restricted:
<iframe
  src="http://localhost:3000/chatbot/a1b2c3d4-e5f6-7890-abcd-ef1234567890"
  style="width: 100%; height: 700px; border: none; border-radius: 8px;"
  allow="microphone"
  title="Support Chatbot"
></iframe>
Limitations:
- No streaming (responses appear all at once)
- No API key auth (the chatflow must be public)
- Limited customization (you get Flowise's default chat UI)
Use iFrame only when you can't run JavaScript.
Verification
Test the REST API endpoint from your terminal:
curl -s -X POST \
  http://localhost:3000/api/v1/prediction/a1b2c3d4-e5f6-7890-abcd-ef1234567890 \
  -H "Content-Type: application/json" \
  -H "Authorization: Bearer fl-your-api-key-here" \
  -d '{"question": "ping"}' | jq .
You should see: A JSON object with a text field containing a response from your chatflow. Response time under 3 seconds for non-RAG flows.
For the JS widget: open your page in a browser, open DevTools Network tab, and look for the POST request to /api/v1/prediction/... when you send a message. Status should be 200.
 Caption: A 200 response in the Network tab confirms the chatflow ID, API key, and host are all correct.
What You Learned
- The
/api/v1/prediction/{chatflowId}endpoint is the core REST interface — use it for any custom integration - Pass
sessionIdto maintain conversation context across requests - The JS widget is the fastest embed path with theming support and optional API key auth
- iFrame works for no-JS environments but loses streaming and auth
- For public sites, use a scoped read-only API key and rotate it if leaked
When NOT to use direct REST API: If you need tool calls, agent loops, or document uploads as part of the chat, keep the session in Flowise and use the widget — direct REST API calls bypass some stateful agent behaviors.
Tested on Flowise 2.2.x, Node.js 20, Ubuntu 24.04 and macOS Sequoia