Problem: Servo Control That Works With Every Smart Home
You want WiFi-controlled servos on your ESP32-S3, but MQTT requires a broker, and custom REST APIs don't integrate with Apple Home or Google Home. Matter solves all of this — one protocol, every platform.
You'll learn:
- How to set up esp-matter SDK on ESP32-S3
- Why Matter commissioning works differently than regular WiFi setup
- How to map a Matter
OnOffcluster to servo position
Time: 25 min | Level: Intermediate
Why This Happens
Matter runs over Thread or WiFi and exposes a device descriptor that smart home hubs understand natively. The ESP32-S3 is ideal because it has enough RAM (512KB) to hold the Matter stack and dedicated USB for flashing without a separate UART chip.
The tricky part: Matter doesn't have a native "servo" device type. You map servo position to an existing cluster — OnOff for binary (0°/90°) or LevelControl for variable position (0–180°).
Common stumbling blocks:
esp-matterrequires IDF v5.1.3+ — older versions silently fail commissioning- Matter commissioning QR codes expire if the device resets before pairing
- Servo jitter caused by PWM timer conflicts with the Matter WiFi stack
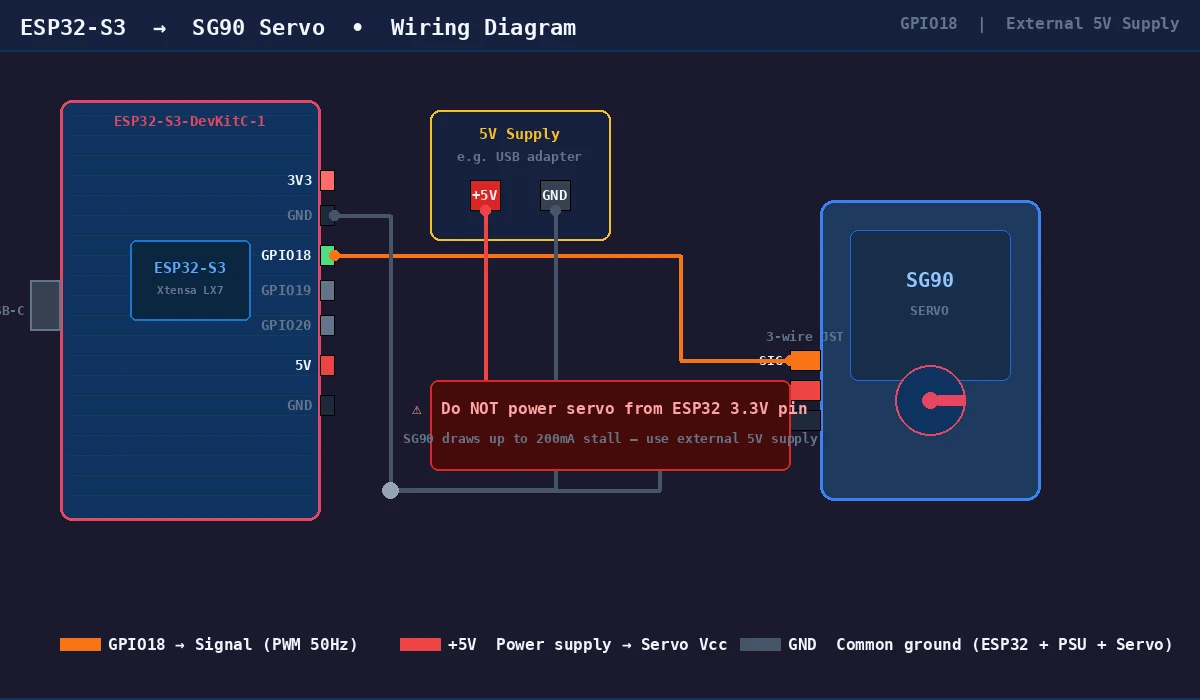 GPIO 18 to servo signal wire, 5V external supply — don't power the servo from the ESP32 3.3V pin
Solution
Step 1: Install ESP-IDF and esp-matter SDK
You need IDF 5.1.3 and the esp-matter SDK side by side. The version constraint is strict — Matter's mbedTLS patches aren't backported.
# Install IDF 5.1.3 (not the latest — esp-matter pins to this)
mkdir -p ~/esp && cd ~/esp
git clone -b v5.1.3 --recursive https://github.com/espressif/esp-idf.git
cd esp-idf && ./install.sh esp32s3
source ./export.sh

# Clone esp-matter at the matching tag
cd ~/esp
git clone --recursive https://github.com/espressif/esp-matter.git
cd esp-matter && git checkout release/v1.3
./install.sh
source ./export.sh
Expected: Both scripts complete without errors. The idf.py command should report version 5.1.3.
If it fails:
- "Python version not supported": esp-matter requires Python 3.9+. Run
python3 --versionto check. - Submodule errors: Run
git submodule update --init --recursiveinside each repo.
Step 2: Create the Project from the Light Example
The light example is the fastest starting point — it already has OnOff cluster wired up. Swap the LED logic for servo PWM.
cd ~/esp
cp -r esp-matter/examples/light servo_matter
cd servo_matter
idf.py set-target esp32s3
Open main/app_main.cpp. Find the app_driver_light_set_power function — this is where you replace LED GPIO with servo PWM.
Step 3: Configure PWM for Servo on GPIO 18
Standard servos expect 50Hz PWM. Pulse width 1ms = 0°, 2ms = 180°. The ledc peripheral handles this without CPU involvement, which matters because the Matter stack keeps WiFi busy.
#include "driver/ledc.h"

#define SERVO_GPIO       18
#define SERVO_FREQ_HZ    50
#define SERVO_RESOLUTION LEDC_TIMER_14_BIT  // 14-bit gives fine position steps

// Call once in app_main() before Matter starts
void servo_init(void) {
    ledc_timer_config_t timer = {
        .speed_mode       = LEDC_LOW_SPEED_MODE,
        .duty_resolution  = SERVO_RESOLUTION,
        .timer_num        = LEDC_TIMER_0,
        .freq_hz          = SERVO_FREQ_HZ,
        // Auto-clock lets IDF pick best source — avoids WiFi interference
        .clk_cfg          = LEDC_AUTO_CLK,
    };
    ledc_timer_config(&timer);

    ledc_channel_config_t channel = {
        .gpio_num   = SERVO_GPIO,
        .speed_mode = LEDC_LOW_SPEED_MODE,
        .channel    = LEDC_CHANNEL_0,
        .timer_sel  = LEDC_TIMER_0,
        .duty       = 0,
        .hpoint     = 0,
    };
    ledc_channel_config(&channel);
}

// angle: 0–180 degrees
void servo_set_angle(uint8_t angle) {
    // Map 0–180° to 1ms–2ms pulse at 14-bit resolution with 50Hz period
    // Period = 20ms. At 14-bit (16384 steps): 1ms = 819, 2ms = 1638
    uint32_t duty = 819 + (angle * (1638 - 819) / 180);
    ledc_set_duty(LEDC_LOW_SPEED_MODE, LEDC_CHANNEL_0, duty);
    ledc_update_duty(LEDC_LOW_SPEED_MODE, LEDC_CHANNEL_0);
}
Expected: Calling servo_set_angle(90) before Matter starts should move the servo to center position.
Step 4: Wire Matter OnOff Callback to Servo
Replace the LED logic in the attribute update callback. Matter calls this whenever a controller changes the OnOff attribute.
// In app_driver.cpp — find app_driver_attribute_update()
esp_err_t app_driver_attribute_update(app_driver_handle_t driver_handle,
                                       uint16_t endpoint_id,
                                       uint32_t cluster_id,
                                       uint32_t attribute_id,
                                       esp_matter_attr_val_t *val)
{
    if (cluster_id == chip::app::Clusters::OnOff::Id &&
        attribute_id == chip::app::Clusters::OnOff::Attributes::OnOff::Id) {

        // val->val.b is true for ON, false for OFF
        uint8_t target_angle = val->val.b ? 90 : 0;
        servo_set_angle(target_angle);

        ESP_LOGI("servo", "Set to %d degrees (OnOff: %d)",
                 target_angle, val->val.b);
    }
    return ESP_OK;
}
If it fails:
- "cluster_id not matching": Print the cluster_id value — confirm you're on the right endpoint. Matter assigns endpoint IDs starting at 1 for the main device.
- Servo not moving but log prints: Check your external 5V supply. The servo draws ~200mA at stall — enough to brown out the ESP32 if shared.
Step 5: Generate QR Code and Flash
Matter uses a QR code for commissioning. The code encodes your device's discriminator and passcode — set these in menuconfig before flashing.
# Configure discriminator and passcode
idf.py menuconfig
# Navigate to: Component config → CHIP Device Layer → Device Identification Options
# Set: Discriminator = 3840, Passcode = 20202021 (defaults, change for production)

# Build and flash
idf.py build
idf.py -p /dev/ttyUSB0 flash monitor
The QR code URL prints to serial on first boot:
I (1234) chip[SVR]: SetupQRCode: MT:Y.K90IRV01YZ8D00
I (1234) chip[SVR]: Copy/paste the below URL in a browser to see the QR Code:
I (1234) chip[SVR]: https://project-chip.github.io/connectedhomeip/qrcode.html?data=MT:Y.K90IRV01YZ8D00
Open that URL, scan with your home app (Apple Home, Google Home, or Amazon Alexa), and commission the device to your network.
 Copy the MT: string from serial — the QR renders in your browser
Verification
After commissioning, toggle the device from your home app. Watch serial output:
idf.py -p /dev/ttyUSB0 monitor
You should see:
I (45231) servo: Set to 90 degrees (OnOff: 1)
I (48102) servo: Set to 0 degrees (OnOff: 0)
And the servo physically moves to match.
 Apple Home shows the device as a light switch — servo moves on toggle
What You Learned
- Matter on ESP32-S3 maps cleanly to existing clusters — you don't need a custom cluster for basic servo control
LEDC_AUTO_CLKis essential to prevent PWM jitter when WiFi is active- The
lightexample is the fastest bootstrapping path forOnOff-based devices
Limitation: OnOff only gives you binary positions. For variable angle (0–180°), use the LevelControl cluster instead — current_level maps to 0–254, which you scale to 0–180°.
When NOT to use this: If you need sub-millisecond servo response (robotics, RC), Matter's ~100ms round-trip latency over WiFi is too slow. Use direct PWM with an RTOS task instead.
Tested on ESP32-S3-DevKitC-1 v1.1, esp-idf v5.1.3, esp-matter release/v1.3, SG90 servo, macOS & Ubuntu 24.04