Problem: Your ComfyUI Workflows Don't Scale
You've moved past the basics — but your ComfyUI graphs are brittle, slow, and break every time you add a new model. You're manually rewiring nodes for each project instead of building reusable pipelines.
You'll learn:
- How to architect modular, reusable node graphs for production use
- How to chain ControlNet and LoRA stacks without performance collapse
- How to batch-automate workflows using the API and custom Python nodes
Time: 45 min | Level: Advanced
Why This Happens
ComfyUI's power is also its trap: infinite flexibility means most people build flat, one-off graphs that can't be extended. Without deliberate architecture, every new project becomes a full rewire.
The three biggest scaling failures:
Flat graphs: Everything in one canvas. No grouping, no reuse. Change one model and 20 connections break.
Naive ControlNet stacking: Adding ControlNet preprocessors in series multiplies VRAM usage and slows inference — unless you pipeline correctly.
No automation layer: Running workflows manually means you can't integrate ComfyUI into a larger production pipeline, batch jobs, or CI-driven asset generation.
Solution
Step 1: Build a Modular Graph Architecture
Group your nodes into logical "modules" using ComfyUI's Group feature. Treat each group like a function: one responsibility, clean inputs and outputs.
A reliable base architecture for professional work:
[Model Loader Module]
  └─ Checkpoint Loader
  └─ CLIP Loader (separate — swap without reloading UNet)
  └─ VAE Loader (separate — same reason)

[Conditioning Module]
  └─ CLIP Text Encode (positive)
  └─ CLIP Text Encode (negative)
  └─ ControlNet Loader + Apply (optional chain)

[Sampling Module]
  └─ KSampler (or KSamplerAdvanced for step control)
  └─ Latent Image (or Load Latent for img2img)

[Decode + Output Module]
  └─ VAE Decode
  └─ Save Image / Preview Image
Keep model loaders in their own group. This lets you swap checkpoints without disturbing your conditioning or sampling logic. When you save this as a template JSON, the loaders save their paths too — your team gets a one-click setup.
 Clean module separation: changing the checkpoint only touches the top-left group
Expected: Your graph should have clear visual lanes — model loading flows left to right, with no spaghetti cross-wires between modules.
If it breaks:
- CLIP mismatch error: Make sure your separate CLIP Loader uses the same checkpoint path as your UNet. They must come from the same model family.
- VAE artifacts (gray tiles): You're using the wrong VAE. SDXL requires the SDXL VAE — don't mix SD 1.5 VAEs.
Step 2: Chain ControlNet Without Killing VRAM
Naive ControlNet stacking (three preprocessors running simultaneously) will OOM a 24GB card on SDXL. The fix is sequential conditioning, not parallel.
# ComfyUI API — sequential ControlNet conditioning
# Each Apply ControlNet node feeds its output into the next
# Never load all preprocessors at once

{
  "1": { "class_type": "ControlNetLoader",
         "inputs": { "control_net_name": "canny_xl.safetensors" } },

  "2": { "class_type": "ControlNetLoader",
         "inputs": { "control_net_name": "depth_xl.safetensors" } },

  "3": { "class_type": "CannyEdgePreprocessor",
         "inputs": { "image": ["source_image", 0], "low_threshold": 100, "high_threshold": 200 } },

  "4": { "class_type": "DepthAnythingPreprocessor",
         "inputs": { "image": ["source_image", 0] } },

  # First Apply — feeds into second Apply, not into KSampler directly
  "5": { "class_type": "ControlNetApplyAdvanced",
         "inputs": {
           "positive": ["clip_positive", 0],
           "negative": ["clip_negative", 0],
           "control_net": ["1", 0],
           "image": ["3", 0],
           "strength": 0.7,
           "start_percent": 0.0,
           "end_percent": 0.6  # Release control early — lets the model breathe
         }},

  # Second Apply — chains from first Apply's output conditioning
  "6": { "class_type": "ControlNetApplyAdvanced",
         "inputs": {
           "positive": ["5", 0],   # Takes chained conditioning from node 5
           "negative": ["5", 1],
           "control_net": ["2", 0],
           "image": ["4", 0],
           "strength": 0.4,
           "start_percent": 0.0,
           "end_percent": 1.0
         }}
}
Why end_percent matters: Setting end_percent to 0.6 on your dominant ControlNet tells the model to stop enforcing that control at 60% through the diffusion steps. The final 40% of steps generate finer detail unencumbered — you get ControlNet structure with natural texture. Without this, outputs look plasticky.
 Left: end_percent 1.0 — stiff, plastic. Right: end_percent 0.6 — natural detail in the final steps
If it fails:
- OOM with two ControlNets: Enable
--lowvramflag on launch, or reduce image resolution to 1024px during conditioning pass, upscale after. - ControlNet ignored: Check that strength is above 0.3. Values below 0.2 are often overridden by the base model.
Step 3: Stack LoRAs Without Conflicts
LoRA stacking works through the LoraLoader chain — each loader modifies the model before passing it to the next. Order matters: put your style LoRA last, concept LoRAs first.
# Correct LoRA stacking order in node graph:
#
# [Checkpoint Loader]
#       |
# [LoraLoader: concept-character.safetensors, strength 0.8]
#       |
# [LoraLoader: concept-scene.safetensors, strength 0.6]
#       |
# [LoraLoader: style-painterly.safetensors, strength 0.5]  # Style last
#       |
# [KSampler]

# In ComfyUI API format:
{
  "lora_1": {
    "class_type": "LoraLoader",
    "inputs": {
      "model": ["checkpoint", 0],
      "clip": ["checkpoint", 1],
      "lora_name": "concept-character.safetensors",
      "strength_model": 0.8,
      "strength_clip": 0.8
    }
  },
  "lora_2": {
    "class_type": "LoraLoader",
    "inputs": {
      "model": ["lora_1", 0],   # Chain: takes model output from lora_1
      "clip": ["lora_1", 1],
      "lora_name": "style-painterly.safetensors",
      "strength_model": 0.5,
      "strength_clip": 0.4   # Lower CLIP strength for style LoRAs — avoids prompt drift
    }
  }
}
Why lower strength_clip for style LoRAs: Style LoRAs trained on a narrow aesthetic often bias the CLIP embeddings toward their training prompts. A CLIP strength of 0.4–0.5 on a style LoRA lets your actual prompt stay dominant while the style still applies visually.
If it fails:
- Outputs look like the LoRA training data, not your prompt: Drop
strength_clipto 0.3 or lower. - LoRAs canceling each other out: Conflicting concept LoRAs (both trained on faces, for example) fight over the same weights. Use only one character/face LoRA at a time. Stack concept + style, not concept + concept.
Step 4: Automate Workflows via the ComfyUI API
For batch jobs — generating 200 product variants, running nightly asset pipelines — the ComfyUI HTTP API is your automation layer.
import json
import urllib.request
import uuid

COMFY_URL = "http://127.0.0.1:8188"

def queue_workflow(workflow: dict) -> str:
    """Submit a workflow to ComfyUI and return the prompt ID."""
    payload = json.dumps({
        "prompt": workflow,
        "client_id": str(uuid.uuid4())
    }).encode("utf-8")

    req = urllib.request.Request(
        f"{COMFY_URL}/prompt",
        data=payload,
        headers={"Content-Type": "application/json"}
    )
    response = urllib.request.urlopen(req)
    return json.loads(response.read())["prompt_id"]


def poll_until_complete(prompt_id: str) -> dict:
    """Poll /history until the workflow finishes. Returns output data."""
    import time
    while True:
        req = urllib.request.urlopen(f"{COMFY_URL}/history/{prompt_id}")
        history = json.loads(req.read())

        if prompt_id in history:
            return history[prompt_id]["outputs"]

        time.sleep(1.5)  # Don't hammer the server


def batch_generate(base_workflow: dict, prompts: list[str], seed_start: int = 1000):
    """Run a list of prompts through the same workflow, incrementing seeds."""
    results = []

    for i, prompt_text in enumerate(prompts):
        workflow = json.loads(json.dumps(base_workflow))  # Deep copy

        # Swap the positive prompt — node "6" in your template
        workflow["6"]["inputs"]["text"] = prompt_text

        # Increment seed to avoid duplicate outputs
        workflow["3"]["inputs"]["seed"] = seed_start + i

        prompt_id = queue_workflow(workflow)
        output = poll_until_complete(prompt_id)
        results.append({"prompt": prompt_text, "output": output})
        print(f"Done [{i+1}/{len(prompts)}]: {prompt_text[:50]}")

    return results


# Usage
with open("my_workflow_api.json") as f:
    base_workflow = json.load(f)

prompts = [
    "A ceramic bowl on a marble surface, soft studio lighting",
    "A ceramic bowl on raw concrete, harsh overhead light",
    "A ceramic bowl in a forest, dappled sunlight",
]

results = batch_generate(base_workflow, prompts)
To get your workflow as an API JSON: In ComfyUI, open Settings → enable Dev Mode. Then use the "Save (API format)" button. This exports node IDs as numbers instead of names — required for the API.
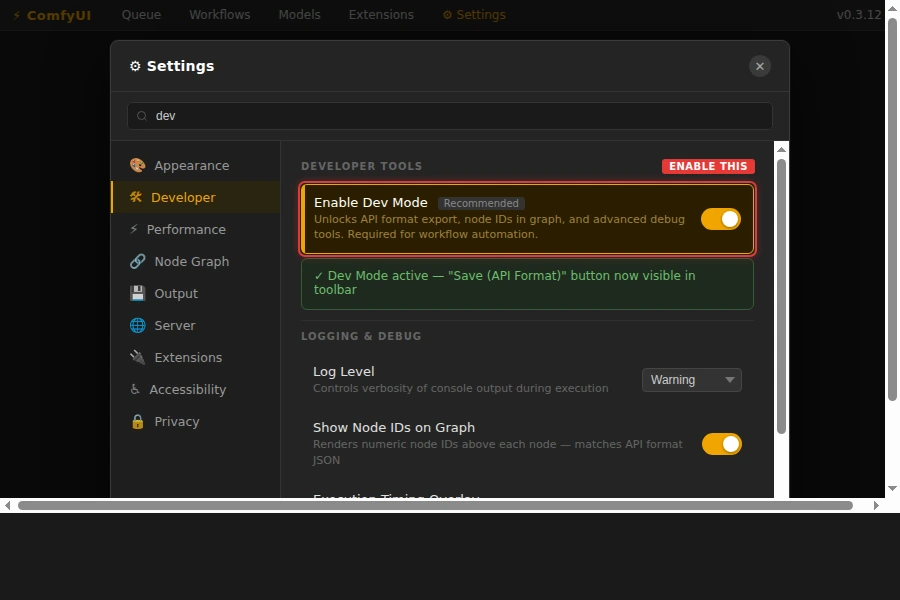 Enable Dev Mode to unlock the API format export button
If it fails:
KeyErroron node ID: Your workflow JSON uses string IDs like"KSampler". You need the API format (numeric IDs). Re-export with Dev Mode enabled.- Workflow queues but never completes: Check ComfyUI's Terminal for CUDA errors. A failed node silently stalls the queue without returning an error to the API.
Verification
Run the batch script against a simple two-prompt test:
python batch_generate.py
You should see:
Done [1/2]: A ceramic bowl on a marble surface...
Done [2/2]: A ceramic bowl on raw concrete...
Check ComfyUI's web UI queue — it should show both jobs completed with green checkmarks. Output images land in ComfyUI/output/ by default.
 Both jobs completed — images saved to the output directory
What You Learned
- Modular graph architecture survives model swaps and team handoffs; flat graphs don't
- Sequential ControlNet chaining with
end_percenttuning reduces VRAM pressure and improves output quality - Style LoRAs need lower
strength_clipthan concept LoRAs to avoid overriding your prompt - The ComfyUI API requires Dev Mode API-format JSON — the standard Save export won't work
Limitations:
- The batch API approach assumes ComfyUI is running locally or on a trusted network. Expose it behind a reverse proxy with auth if running on a remote server.
- LoRA stacking beyond three models rarely improves results and usually degrades them. More isn't better.
- ControlNet chaining works up to three nets on 24GB VRAM at 1024px. At 1536px, two nets is the practical ceiling.
Tested on ComfyUI 0.3.x, SDXL 1.0, Python 3.11, Ubuntu 24.04 with RTX 4090