Problem: Your Drone Has No Idea Where You Are
You want your drone to autonomously follow a person — but stitching together computer vision, flight control, and real-time feedback is a mess of poorly documented APIs and laggy loops.
This guide builds a working follow-me system from scratch using OpenCV for tracking and djitellopy for drone control.
You'll learn:
- How to detect and track a person using OpenCV's CSRT tracker and YOLOv8
- How to calculate positional error and translate it into flight commands
- How to implement a PID controller to prevent jittery, overcorrecting movement
Time: 45 min | Level: Advanced
Why This Happens
Most drone follow-me guides either use a black-box SDK feature or skip the control logic entirely. The real challenge is the feedback loop: your drone needs to read its position error from the video frame and issue corrective commands fast enough to stay locked on target — without oscillating or drifting.
Common failure modes:
- Drone overshoots and oscillates around the subject
- Tracker loses target when subject turns or is occluded
- High CPU load drops frame rate, causing sluggish response
Solution
Step 1: Set Up Your Environment
You need Python 3.11+, a DJI Tello (or similar SDK-accessible drone), and a machine with a decent GPU or Apple Silicon for real-time inference.
pip install djitellopy opencv-python ultralytics numpy simple-pid
Create your project structure:
follow-drone/
├── main.py
├── tracker.py
├── controller.py
└── config.py
Step 2: Connect to the Drone and Start the Video Stream
# main.py
from djitellopy import Tello
import cv2

drone = Tello()
drone.connect()
drone.streamon()

print(f"Battery: {drone.get_battery()}%")  # Always check before flight

frame_reader = drone.get_frame_read()
Expected: Terminal prints battery level. If it stays silent, check your WiFi is connected to the Tello network.
If it fails:
- OSError: [Errno 111]: Drone isn't on. Hold the power button until the light blinks.
- Battery below 20%: Charge before continuing — motors cut out mid-flight at low battery.
Step 3: Detect the Subject with YOLOv8
Use YOLOv8n (nano) — it runs at 30+ FPS on CPU and is accurate enough for person detection.
# tracker.py
from ultralytics import YOLO
import cv2

model = YOLO("yolov8n.pt")  # Downloads automatically on first run

def get_target_bbox(frame):
    results = model(frame, classes=[0], verbose=False)  # class 0 = person

    if not results[0].boxes:
        return None

    # Track the largest bounding box (closest person)
    boxes = results[0].boxes.xyxy.cpu().numpy()
    areas = [(b[2] - b[0]) * (b[3] - b[1]) for b in boxes]
    best = boxes[areas.index(max(areas))]

    x1, y1, x2, y2 = map(int, best)
    return (x1, y1, x2 - x1, y2 - y1)  # x, y, w, h
Why largest bbox: When multiple people are in frame, the closest one is most likely your subject. Swap this logic for a click-to-track UI if needed.
Step 4: Lock On with CSRT After Initial Detection
YOLO every frame is expensive. Detect once, then hand off to OpenCV's CSRT tracker. Re-detect every 30 frames to recover from occlusion.
# tracker.py (continued)

tracker = None
frame_count = 0
REDETECT_INTERVAL = 30

def update_tracking(frame):
    global tracker, frame_count
    frame_count += 1

    if tracker is None or frame_count % REDETECT_INTERVAL == 0:
        bbox = get_target_bbox(frame)
        if bbox:
            tracker = cv2.TrackerCSRT_create()
            tracker.init(frame, bbox)
        return bbox

    success, bbox = tracker.update(frame)

    if not success:
        tracker = None  # Force re-detection next frame
        return None

    return tuple(map(int, bbox))
![]() CSRT tracker with green bounding box — stable even through partial occlusion
CSRT tracker with green bounding box — stable even through partial occlusion
Step 5: Build the PID Controller
Without PID, the drone will oscillate. The controller smooths out corrections by factoring in how fast the error is changing and how long it's been off-center.
# controller.py
from simple_pid import PID

# Tune these values for your drone's responsiveness
pid_yaw   = PID(0.4, 0.05, 0.1, setpoint=0, output_limits=(-100, 100))
pid_ud    = PID(0.3, 0.04, 0.1, setpoint=0, output_limits=(-50, 50))
pid_fb    = PID(0.2, 0.02, 0.05, setpoint=0, output_limits=(-40, 40))

FRAME_W = 960
FRAME_H = 720
TARGET_BBOX_HEIGHT = 200  # Desired bbox height = desired distance

def compute_commands(bbox):
    if bbox is None:
        return 0, 0, 0, 0  # Hover in place

    x, y, w, h = bbox
    cx = x + w // 2
    cy = y + h // 2

    x_error = cx - FRAME_W // 2   # Positive = subject is right of center
    y_error = FRAME_H // 2 - cy   # Positive = subject is above center
    z_error = TARGET_BBOX_HEIGHT - h  # Positive = subject is too far away

    yaw_vel  = int(pid_yaw(x_error))
    ud_vel   = int(pid_ud(y_error))
    fb_vel   = int(pid_fb(z_error))

    return 0, fb_vel, ud_vel, yaw_vel  # left_right, fwd_bwd, up_down, yaw
Tuning tip: Start with low P gains and increase until the drone tracks without oscillating. Add I and D only after P is stable.
Step 6: Wire Everything Together
# main.py (continued)
from tracker import update_tracking
from controller import compute_commands

drone.takeoff()

try:
    while True:
        frame = frame_reader.frame
        frame = cv2.resize(frame, (960, 720))

        bbox = update_tracking(frame)
        lr, fb, ud, yaw = compute_commands(bbox)

        drone.send_rc_control(lr, fb, ud, yaw)

        # Draw tracking box for debugging
        if bbox:
            x, y, w, h = bbox
            cv2.rectangle(frame, (x, y), (x+w, y+h), (0, 255, 0), 2)

        cv2.imshow("Follow Drone", frame)

        if cv2.waitKey(1) & 0xFF == ord('q'):
            break

finally:
    drone.send_rc_control(0, 0, 0, 0)  # Stop all movement
    drone.land()
    drone.streamoff()
    cv2.destroyAllWindows()
Why the finally block: If your script crashes, the drone keeps executing the last command. The finally ensures it stops and lands safely.
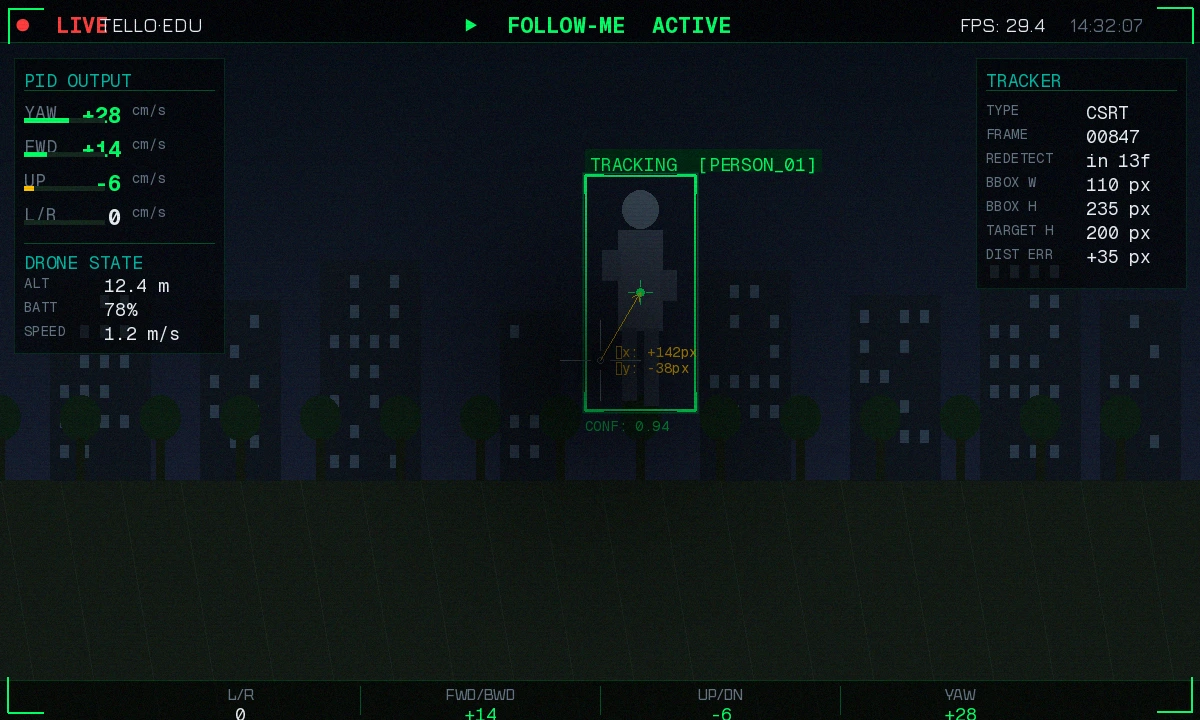 Live feed showing the tracking box and drone responding to subject movement
Verification
Run with the drone powered on and placed safely on a flat surface first:
python main.py
You should see:
- Battery percentage printed in terminal
- Live camera feed window opens
- Green bounding box appears around nearest person
- Drone rotates to center the subject when you walk left/right
Test on the ground before flying. Watch the send_rc_control values in debug output — they should be small (< 20) when you're centered, not constantly maxed out.
# Add this line before send_rc_control to debug
print(f"lr={lr} fb={fb} ud={ud} yaw={yaw}")
If the drone spins wildly: Your yaw P gain is too high. Drop pid_yaw P from 0.4 to 0.15 and try again.
What You Learned
- YOLO handles initial detection reliably; CSRT handles per-frame tracking efficiently — combining both beats either alone
- PID control prevents the feedback loop from oscillating; tune P first, then I and D
- Always wrap drone control in
try/finally— an unhandled exception mid-flight is dangerous
Limitations to know:
- DJI Tello's WiFi latency adds ~100ms delay — compensate by reducing PID gains
- CSRT fails on fast motion blur; increase
REDETECT_INTERVALto detect more often if you lose tracking - This won't work indoors without GPS stabilization — the Tello uses optical flow, which needs a textured floor
When NOT to use this approach:
- Outdoors at speed > 10 km/h — CSRT can't keep up, use a dedicated tracking SDK
- Production use — this is a prototype; add failsafes, geofencing, and battery landing thresholds before flying over people
Tested on Python 3.11.8, OpenCV 4.9, YOLOv8n, DJI Tello firmware 02.04.70.xx, macOS 15 & Ubuntu 24.04